
Abstract
For uremic patients with a vascular access, cannulations for hemodialysis are necessary. There are two cannulations, one on the arterial side to draw blood to the dialysis machine, and the other on the venous side to pass back blood into the body. If the cannulation is not smooth, the patient would painfully suffer from repeatedly needling, also causing the life of the access to reduce.
The use of ultrasound-guided cannulation can reduce the possibility of cannulation failure, allowing for less repeated cannulation of the access, thus extending the lifetime of the access.
This article would explain how to combine ultrasound techniques and cannulation skills to complete ultrasound-guided cannulations. Doctor Han Yun Kai hopes to promote this technology through this article to benefit hemodialysis patients.
Preface
Uremic patients with a vascular access must receive two cannulations at each hemodialysis. One cannulation on the arterial side and the other on the venous side. These two arteriovenous access needle sets connect the tubing sets and form a loop to perform hemodialysis. The frequency of the needling in uremic patients is relatively high, so reducing the damage caused by repetitive cannulation and extending the access's survival becomes a critical issue. (Uremic patients generally carry out hemodialysis three times a week, totalling up to six cannulations per week!) The use of an ultrasound can assist the doctors in small needle adjustments and help doctors reduce cannulation failure rates.
Notes on how to use the ultrasound to guide the cannulation:
(1) Preparation of skin area:
Spray the area of the skin where ultrasound will be performed with RO water (or 75% alcohol or chlorhexidine (2% or 4%)). Then cover the area with a PE film (e.g. plastic wrap). (The RO water is essential as it maintains conductivity between the skin and the PE film.) After an ultrasound examination, remove the used PE film to prevent coupling gel residue from getting on the skin's surface. Removing the coupling gel residue will reduce the chance of additional infections.
(2) Preparation of the ultrasound probe :
Use a 6.0 to 9.0MHz linear probe. Coat the probe with the coupling gel and wrap it with PE film, then coat the PE Film with another layer of coupling gel. To decrease the chances of cross-infection, use a new PE film when attending to another patient.
(3) Using the ultrasound to assess the hemodialysis vascular access:
To generally assess one's initial cannulation date, check (1) Number of days after the vascular access surgery (the access maturity generally needs approximately 6-8 weeks for the autologous fistula and 3-6 weeks for the artificial graft). (2) Auscultation: both systolic and diastolic continuous low-pitched bruit. (3) Palpation: both systolic and diastolic continuous soft thrill.
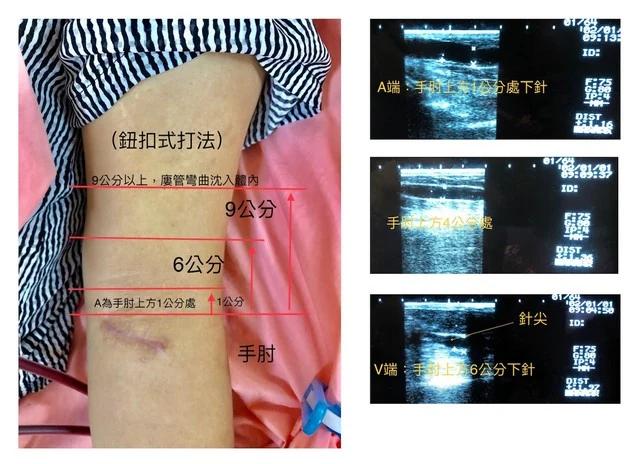
For most vascular access, these evaluations are sufficient for the initial cannulation, but all of these are indirect assessments. Instead of using the indirect assessments above, the ultrasound can make a direct and accurate judgement for the access condition. The ultrasound can evaluate the access by displaying the access blood flow, the subcutaneous depth, the access diameter, the access direction and the access curvature. These data can help medical staff make various ultrasound-based access maps (as shown in Figures 1-3).
KDOQI Guidelines suggest the use of the Rule of 6s to describe the characteristics of the maturity of the access. These characteristics are: (1) The access blood flow is greater than 600ml/min. (2) The subcutaneous depth is less than 0.6cm. (3) The access diameter is greater than 0.6 cm.
Ultrasounds can quickly get the access condition and the "Rule of 6s" data to help medical staff carry out the cannulation.
Figure 1: The ultrasound-based access map
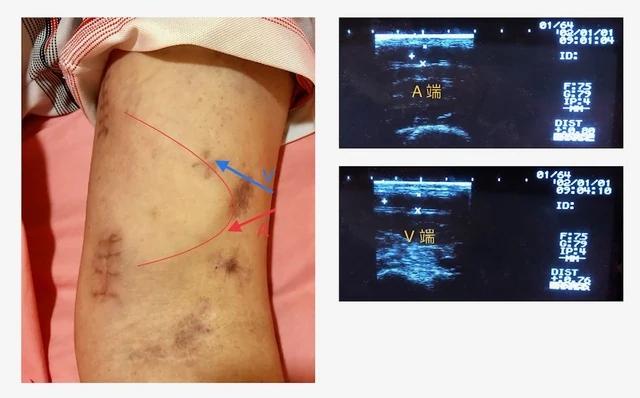
Figure 2: The ultrasound-based access map
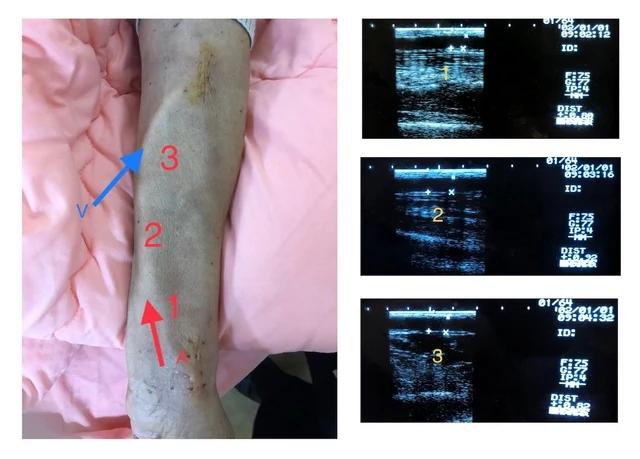
Figure 3: The ultrasound-based access map
(4) Ultrasound-guided cannulation
The depth of the access is known by ultrasound examination. The vertical depth of the needle-tip under the skin can be derived from two factors, the length of the needle outside the skin and the puncture angle. For example, if the total needle length is 2.5 cm with a punctured angle of 30 degrees and the needle outside the skin is 1.5 cm, the vertical length of the needle-tip under the skin is 0.5 cm. From the same inference, if the needle outside the skin is 1.0 cm, the vertical length of the needle-tip under the skin is 0.75 cm ( Figure 4 ). The summarized relationship between the puncture angle, the needle length outside the skin, the verticle length of needle-tip under the skin and the horizontal distance between the needling site and the needle-tip can be seen in Tables 1 and 2.
Figure 4: When the total needle length is 2.5 cm, and the puncture angle is 30 degrees, the vertical length of the needle-tip under the skin is derived from the needle length outside the skin
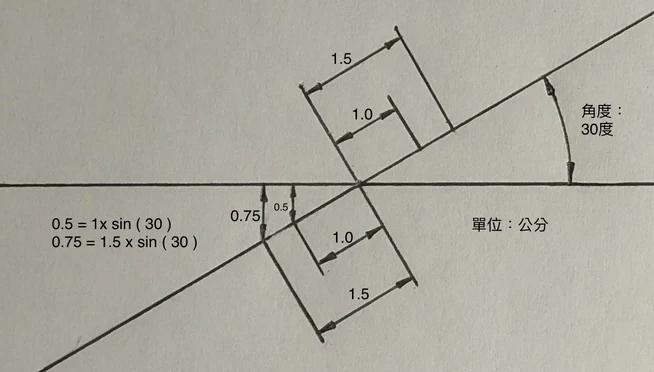
Table 1:The conversion table for the vertical distance between the skin surface and the needle-tip after the cannulation at the different puncture angles and the different lengths of the needle outside the skin.
Puncture Angle | 20︒ | 25︒ | 30︒ | 35︒ | 40︒ | 45︒ |
|---|---|---|---|---|---|---|
Needle Length on Skin: 1.5cm | 0.342a | 0.422 | 0.500 | 0.574 | 0.643 | 0.707 |
Needle Length on Skin: 1.0cm | 0.513 | 0.634 | 0.750 | 0.860 | 0.964 | 1.061 |
*Unit: Centimeter
*a: If the needle length on the skin is 1.5cm, the needle length underneath the skin will be 1.0cm, as shown in: 1.00 x sin(20) = 0.342. So when the puncture angle is 20 degrees, the needle length underneath the skin is 1.0cm, and the vertical distance betweeen the skin surface and the needle-tip is 0.342cm.
Table 2: The conversion table for the horizontal distance between the needling site and the needle-tip after cannulation:
Puncture Angle | 20︒ | 25︒ | 30︒ | 35︒ | 40︒ | 45︒ |
|---|---|---|---|---|---|---|
Needle Length on Skin: 1.5cm | 0.940a | 0.906 | 0.866 | 0.819 | 0.766 | 0.707 |
Needle Lenght on Skin: 1.0cm | 1.410 | 1.359 | 1.299 | 1.230 | 1.149 | 1.061 |
*Unit: Centimeter
*a: When the length of the needle outside the skin is 1.5cm, then the length of the needle under the skin is 1.0cm, as shown in: 1.0 x cos (20) = 0.94. So when the puncture angle is 20 degrees and the length of the needle outside the skin is 1.5cm, the horizontal distance between the needling site and the needle-tip after cannulation is 0.94 cm.
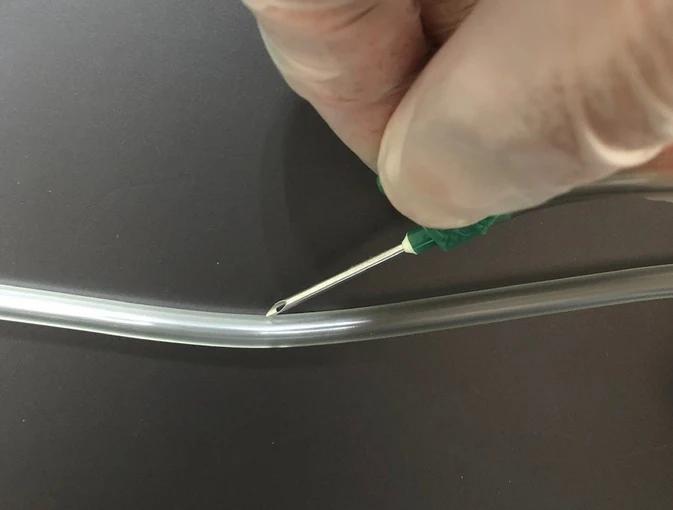
The following two points can confirm the puncture angle: (1) the distance between the needle-tip and the edge of the thumb and (2) the needle tube against the thumb. For example, when the needle-tip is 2 cm from the edge of the thumb and the needle tube is against the thumb, the puncture angle is approximately 30 degrees (as shown in Figure 5). When the needle-tip is 1.5 cm from the edge of the thumb, and the needle tube is against the thumb, the puncture angle is approximately 35 degrees. When the needle-tip is 1.0 cm from the edge of the thumb, and the needle tube is against the thumb, the puncture angle is approximately 40 degrees. The puncture angle is obtained by the method shown in Figure 5. Since thumb thicknesses vary between each person, the actual puncture angle must also be slightly adjusted. For this reason, using an indexer (as shown in Figure 6) verifies the desired puncture angle. For a successful puncture, let the needle reach the correct depth, let the needle-tip in the access, and make sure you see the blood reflux in the needle tube. There are various conditions during the cannulation, for example, the needle is slightly skew-whiff, the puncture angle is off, the needle length outside the skin is not assessed well, the vascular access is not fixed well, the access will move when the needle is touching the access during the cannulation (shown in Figure 7), and so on. So even if the puncture angle, the vertical depth and the horizontal distance are right, one can not say the cannulation was perfect. The cannulator must have a good foundation in cannulation techniques (without the ultrasound) beforehand to get the best out of the ultrasound-guided cannulation technique. To become skilled in ultrasound-guided cannulations, one must depend on practice.
Figure 5: The needle-tip is 2 cm from the edge of the thumb and the needle tube against the thumb, the puncture angle is approximately 30 degrees.
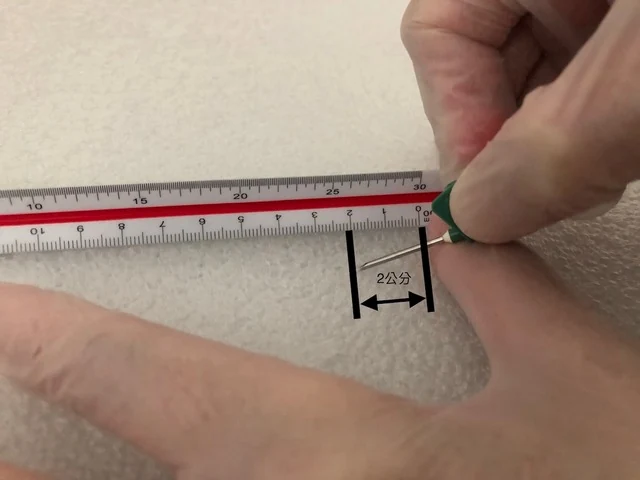
Figure 6: The indexer measures the puncture angle
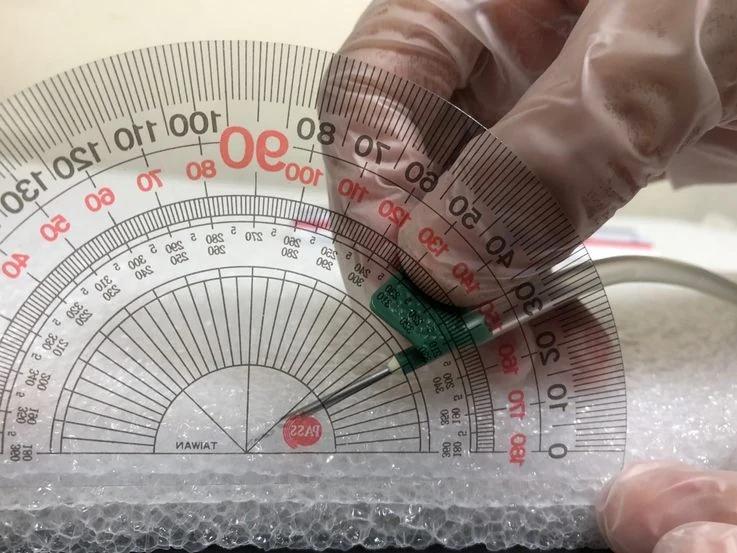
Figure 7: The access sinks when the needle-tip is touching the access
The advantages of ultrasound-guided cannulation:
(1) Ultrasound-guided cannulation can successfully cannulate the difficult-to-approach access:
For example: In a situation when the Permcath must be removed because of infection or occlusion and the new access has healed for the recommended amount of time, yet, the access is still too deep (the depth is more significant than 0.6cm and/or the diameter is less than 0.6cm), ultrasound-guided cannulation can efficiently complete the cannulation procedure (as shown in Figure 8 and 9).
Figure 8: The maximum vertical depth of the access is 1.97cm, and the diameter of the access is 0.68 cm
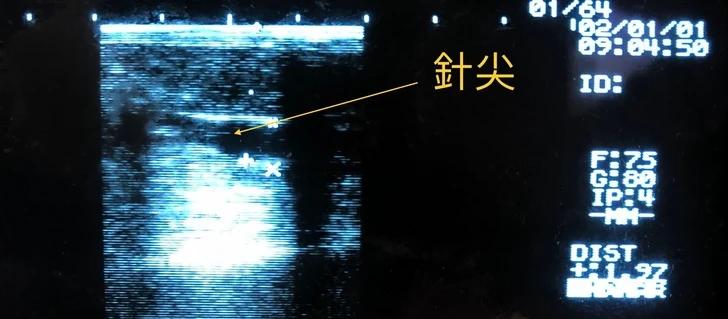
Figure 9: The diameter of the access is only 0.32cm
(2) To find the ideal puncture site:
The ultrasound shows the access data, including the depth under the skin, the diameter, the direction and the curvature, so the cannulator using the access data can accurately find the puncture site of the buttonhole cannulation and the puncture range of the rope-ladder cannulation.
(3) The assistance of the ultrasound to reposition the needle:
There are two conditions which need the assistance of the ultrasound to adjust the needle:
The first condition: The cannulation is not smooth.
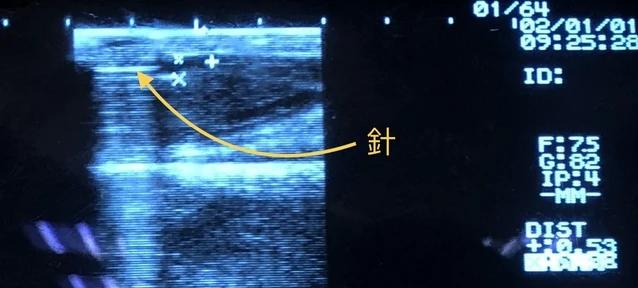
The ultrasound can show the relative position between the needle and the access if the cannulation is not smooth. If a failed cannulation occurs, the cannulator can reposition the needle in the access with ultrasound guidance. (Without an ultrasound, the cannulator would need to repeatedly cannulate to find the access by his/her experience.)
The second condition: Dialysis machine alarm rings, or if the patient feels pain over the access Area.
If the abnormal tubing pressure causes the dialysis machine's alarm to sound, or if the patient feels pain over the access area during the dialysis, repositioning the needle is necessary. There are a few situations for repositioning the needle during the hemodialysis.
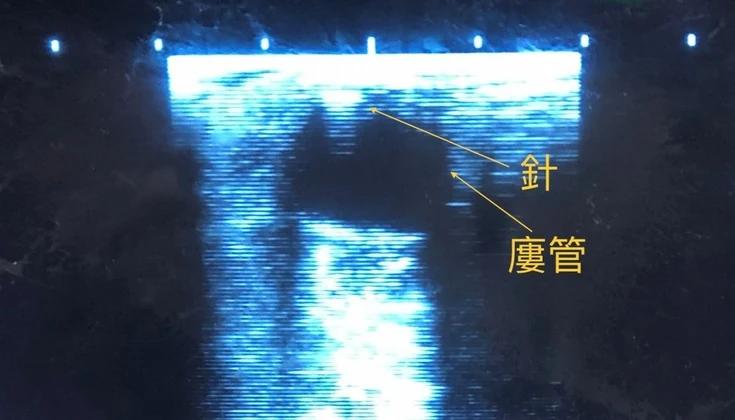
The first situations are relatively simple: the access diameter is large or the needle tip is just touching the access wall (as shown in figure 10). For these situations, we turn down the blood flow rate and turn off the blood pump. The cannulator repositions the needle in the access correctly by the ultrasound guidance. Then, turn on the blood pump, gradually set the blood flow rate to a standard value, and perform the hemodialysis again.
The second situations are relatively complicated: If the access is thin/curved or if there is already a thrombosis in the access. In these situations, the cannulator should separate the tubing sets from the needle sets, disconnecting the patient from the machine. Under these situations use the ultrasound to guide the repositioning of the needle in the access properly. Then, connect the tubing sets to the needle sets again to complete the hemodialysis.
Figure 10: The needle-tip is just touching the access upper wall
(4) The ultrasound can be used in the thrombus management of the vascular access:
There are two conditions which need the ultrasound guidance to deal with the thrombi in the access:
The first condition: One can use the ultrasound to confirm whether there are thrombi or occlusions in the access or not. For example: If the auscultation shows that the bruit is discontinuous, high-pitched, or very faint and the palpation shows that the thrill is discontinuous or weak, the cannulator can use the ultrasound to confirm whether there is a thrombosis in the access.
The second condition: After cannulation, the syringe containing the normal saline to test blood reflux shows that the blood cannot be drawn back, but the auscultation and palpation are almost normal, and the ultrasound confirms that the needle in the access properly, there are two processing methods:
The first method: in the arterial side, if there are not many thrombi, the cannulator can try to reposition the needle left and right or back and forth under the ultrasound guidance to see whether the thrombus on the needle-tip can be shaken off or drawn out to the syringe. If it is still not possible, the cannulator should keep the puncture site away from the thrombus and cannulate again. If no puncture site can stay away from the thrombus, the cannulator should contact the access treatment department to deal with the thrombus problems.
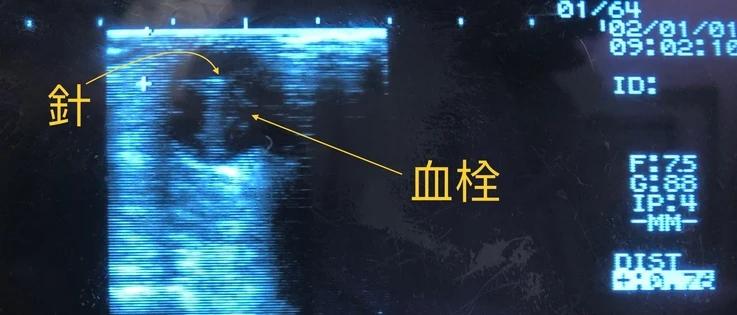
The second method: In the venous side, if ultrasound confirms the needle is in the access properly, the cannulator should be able to smoothly push the normal saline into the access, but the blood cannot be drawn out from the access. In this condition, there are not many thrombi near the needle-tip (as shown in Figure 11). If this patient for whom the anticoagulant (heparin) can be used, we can use the anticoagulant to carry out the hemodialysis. At the beginning of the hemodialysis process, the blood flow rate slowly speeds up from the low flow rate to the prescribed blood flow rate. At the same time, we must observe the patient's condition. If the patient feels pain over the puncture area or the dialysis machine shows that the vein pressure is abnormally high, the hemodialysis should be stopped immediately, and the hemodialysis staff should transfer the patient to a hospital to treat the access problems.
Figure 11: some thrombi near the needle-tip
Conclusion
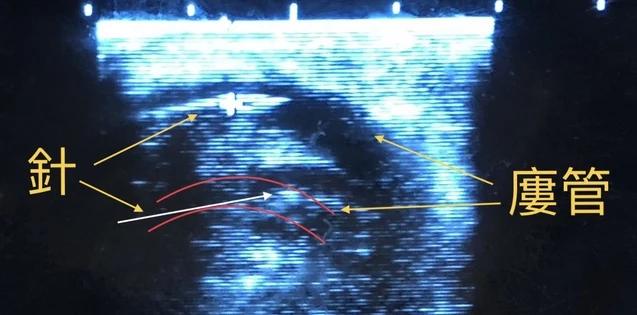
Cannulations with or without ultrasound guidance are compatible. Cannulation without ultrasound guidance can allow one to save time. The ultrasound-guided cannulation is used for the more complicated condition ( as shown in Figure 12). For example, the access is too deep, too thin or curved. In these situations, it is not easy to cannulate the access, and the chance of the repeated cannulation is increased. Therefore, the general cannulation without ultrasound and the ultrasound-guided cannulation are complementary and can be perfectly combined to complete the execution of the cannulations in the dialysis center.
Figure 12: The needle in the curved access
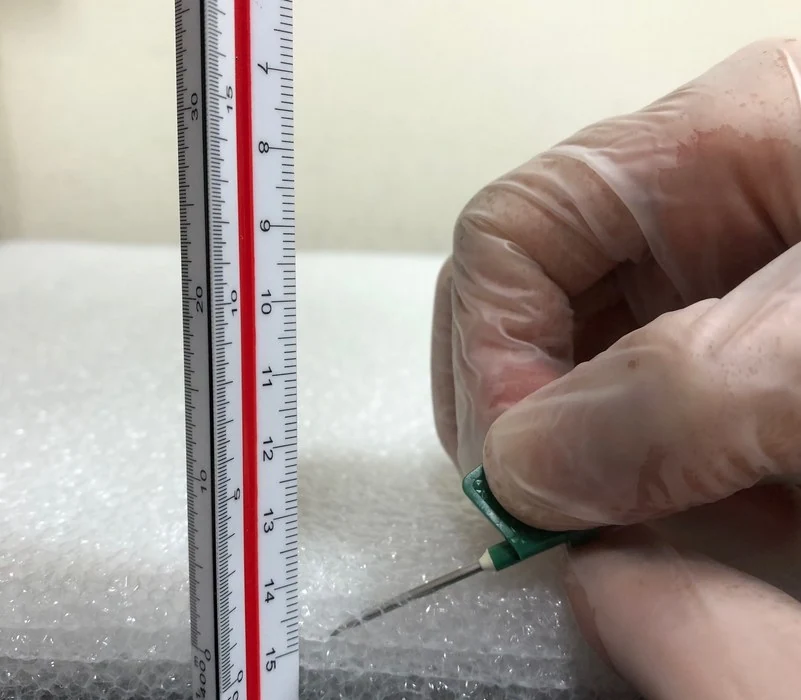
The ultrasound-guided cannulation likes all the other techniques. The more one practices, the better one understands its advantages and know how to use it. Then, the cannulation technique becomes an art. According to each patient's condition, the cannulator can select the best method to carry out cannulation. The cannulator can practice more with the EPE (Expandable Polyethylene) foam board (shown in Figure 13), which is translucent and can see if the needle tip reaches the desired vertical depth under the skin during the exercise. For the cannulator who is proficient in the general cannulation technique, using ultrasound-guided cannulation technique can reduce the failure rate of the cannulation to even lower. So using ultrasound-guided cannulation is good news for the hemodialysis patient. Nowadays, it is hard to find medical facilities without an ultrasound. The application of the ultrasound used in the vascular access has also been discussed internationally. Based on the author's research and clinical experience, this article combines the ultrasound and the cannulation technique to explain in detail how to operate the ultrasound-guided cannulation technique. The author hopes that more medical staff can be devoted to this research and use this technique to benefit patients.
Figure 13: Using the EPE foam board to practice the cannulation
References
1.韓雲楷:台灣基層透析協會,108年度會員大會及學術演講年刊 2019;19-22.
2.Robbin ML, Greene T, Allon M, et al. Prediction of Arteriovenous Fistula Clinical Maturation from Postoperative Ultrasound Measurements: Findings from the Hemodialysis Fistula Maturation Study. J AM Soc Nephrol. 2018;29.
3.Harwood LE, Wilson BM, Oudshoorn A. Improving vascular access outcomes: attributes of arteriovenous fistula cannulation success. Club Kidney J. 2016;9(2):303-309.
4.Doss S, Schiller B, Moran J. Buttonhole cannulation—an unexpected outcome. Nephrology nursing journal. 2008;35(4):417-419.
5.Rayner HC, Pisoni RL, Gillespie BW, et al. Creation, cannulation and survival of arteriovenous fistulae: data from the Dialysis Outcomes and Practice Patterns Study. Kidney Int. 2003;63(1):323-330.
6.Robbin ML, Chamberlain NE, Lockhart ME, Gallichio MH, Young CJ, Deierhoi MH, Allon M. Hemodialysis arteriovenous fistula maturity : US evaluation. Radiology 2002 Oct ; 225(1):59-64.
7.Twardowski Z. Update on cannulation techniques. J Vasc Access 2015; 16 (Suppl 9): s54-s60
8.Patel R, Stern AS, Brown M et al. Beside ultrasonography for arteriovenous fistula cannulation. Seminars in Dialysis 2015; 28:433-434
9.Jaques PF, Mauro MA,Keefe B, US guidance for vascular access Technical note. J vasc Interv Radiol 1992; 3: 427-430
10.Davidson I,Chan D, Dolmatch B, Hasan M, Nichols D, Saxena R,Shenoy s, Vazquez M,Gallieni M.Duplex ultrasound evaluation for dialysis access selection and maintenance : a practical guide. J Vasc Access 2008;9:1-9
11.Malovrh M.Strategy for the maximal use of native arteriovenous fistulae for hemodialysis. Sci World J 2006;6:808-815
12.Farrel J,Gellens M. Ultrasound-guided cannulation versus the landmark-guided technique for acute haemodialysis access. Nephrol Dial Transplant.1997;12:1234-7
13.Troianos CA,Jobes David R, Ellison N. International anesthesia research society.1991;72:823-6
14.National Kidney Foundation: KDOQI clinical practice guidelines and clinical practice recommendations for vascular access 200. Am J Kidney Dis.2006;48:S176-S322